Example Campaign: Post Transaction Follow-Up
The Cloze Campaigns feature is included as part of the Cloze Business Platinum Plan.
GOAL: Strengthen your relationship after the purchase or sale has closed.
This post-transaction follow-up Campaign is designed to help strengthen your relationship with the buyer(s) or seller(s) after the purchase or sale.

What this campaign does:
- It tied to the first Next Step for a Past Buyer or Past Seller. So it starts as soon as a Buyer or Seller is set to the Past (or Closed).
- It pauses between campaigns steps to spread the follow-up out over the year
- It pauses automatically when you’re actively talking so there’s no “crosstalk”
- At the end of one year it switches to a long-term nurture campaign.
Below you will find the steps required to help you recreate a similar campaign in your account.
How to create a similar Campaign in your Cloze account
1.) Navigate to the Cloze Library to create the Campaign
Here are step-by-step instructions on how to create a Campaign.
2.) Design your Campaign
Below you will find the same steps used in the picture above. In italics, in the right column, you will find the specific type of step used and link with additional instructions.
|
|
Step Name | Campaign Step
|
| 1.) | Wait 2 days | Use wait for a Fixed Amount of Time |
| 2.) | Add "Call to check-in post closing" to Agenda | Use Add a To Do to Agenda |
| 3.) | Wait 10 Days | Use wait for a Fixed Amount of Time |
| 4.) | Add "Text to see how the move went" to Agenda | Use Add a To Do to Agenda |
| 5.) | Wait 2 weeks | Use wait for a Fixed Amount of Time |
| 6.) | Automatically Send "Need anything?" Email | Use Auto Send Email |
| 7.) | Wait 2 months | Use wait for a Fixed Amount of Time |
| 8.) | Automatically Send "Recommendations" Email | Use Auto Send Email |
| 9.) | Wait 45 days | Use wait for a Fixed Amount of Time |
| 10.) | Add "Schedule a home visit" to Agenda | Use Add a To Do to Agenda |
| 11.) | Wait 45 days | Use wait for a Fixed Amount of Time |
| 12.) | Automatically Send "It's been six months!" Email | Use Auto Send Email |
| 13.) | Wait 6 months | Use wait for a Fixed Amount of Time |
| 14.) | Automatically Send "Anniversary of closing" Email | Use Auto Send Email |
| End of Campaign* |
A couple of tips:
Tip #1: Sketch out your campaign
Add all of the steps you wish to include in your Campaign first, and then go back and add all the details. This gives you a high-level view before you dig into the specifics.
Tip #2: Use Placeholders for templates
If you have not yet created a template you can use a placeholder instead. You can then return to the placeholder template in the Cloze Library to add your content at a later time. This is helpful when you are sketching out a campaign, but haven't yet created all of the content.
3.) Link it to the appropriate Next Step
Once you have created the Campaign you can link it to the "Post Transaction Follow-up" Next Step in Settings.
Before you link the Campaign to the Next Step, you must first enable a Follow-up Template on the Next Step (please see tip #2 below). Once the template is enabled you can link the Campaign to the "Post Transaction Follow-up" Next Step.
A few more tips:
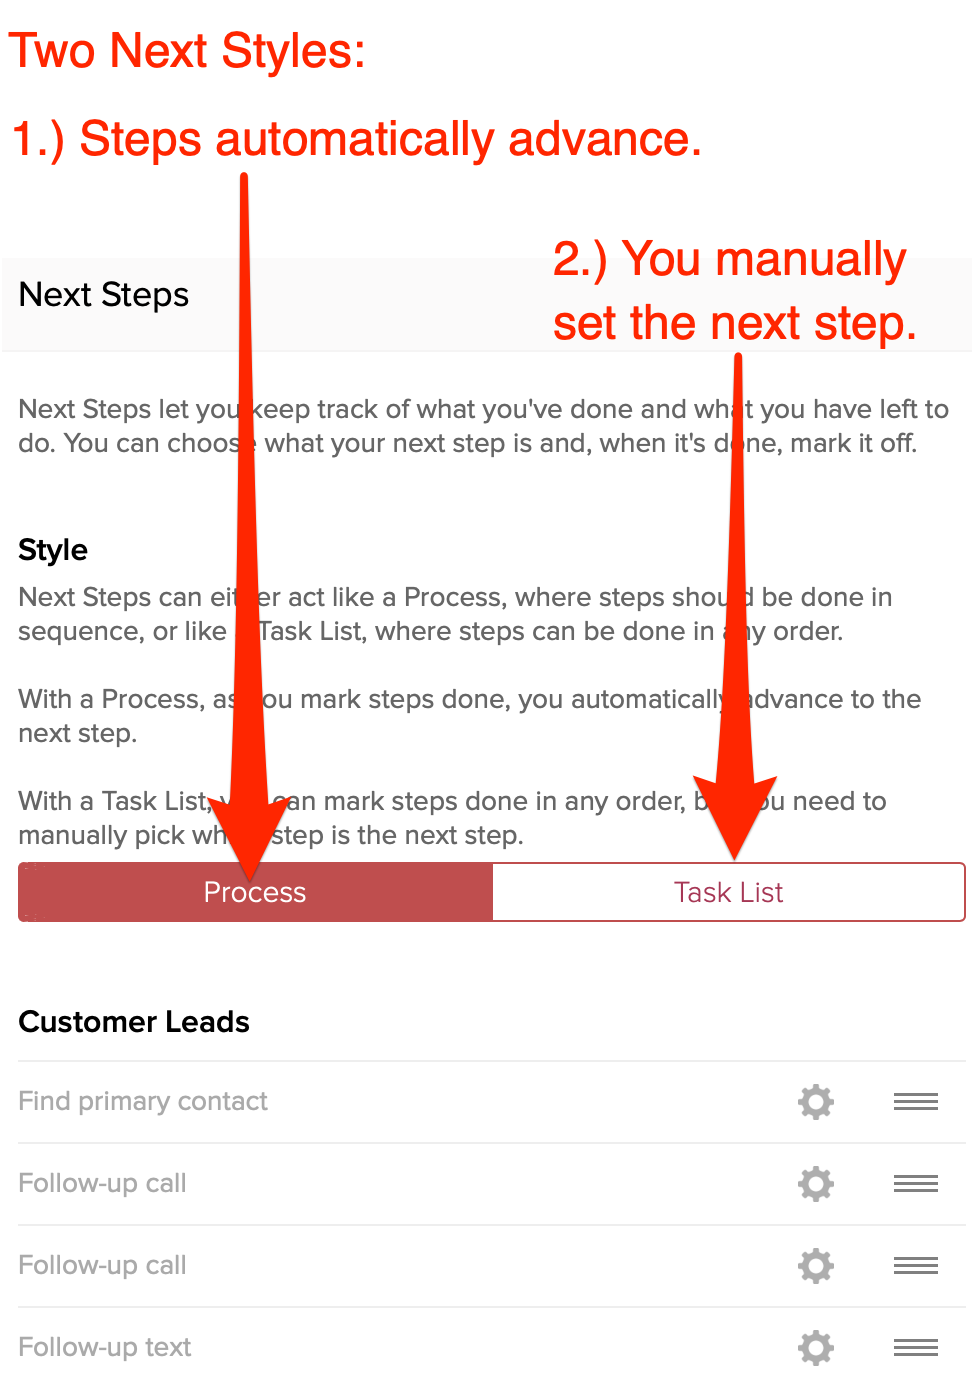
Tip #1: Cloze has two Styles of Next Steps. Set the Style to Process Mode to ensure it automatically triggers when you set someone to a Past Buyer or Past Seller.
Next Steps can either act like a Process, where steps should be done in sequence, or like a Task List, where steps can be done in any order.
- With a Process, as you mark steps done, you automatically advance to the next step.
- With a Task List, you can mark steps done in any order, but you need to manually pick which step is the next step.
Tip #2: Make sure to enable a template for the "Post Transaction Follow-up" Next Step.

Tip #3: Linking the Campaign to the Next Step

Select Next Step.

Find the Stage and Segment and then toggle on the Next Step that will trigger the campaign.

4.) Test your Campaign
Next, we recommend that you test your campaign.
Here are step-by-step instructions on how to test your campaigns.
We also recommend reviewing these best practices to help avoid any accidental trouble.