How do I create a Cloze Campaign?
The Cloze Campaigns feature is included as part of the Cloze Business Platinum Plan.
Cloze Campaigns are a way to automate follow-up and other processes. You can think of each client as their own, unique "audience of one". Different content can be sent at different times to each person or a Campaign can automate specific actions against each unique person.
If you are part of a team, Campaigns can be created by your team leader or an administrator and then published when ready. Individual team members can also create their own Campaigns and save them in their Library.
Create a new Campaign in the Library
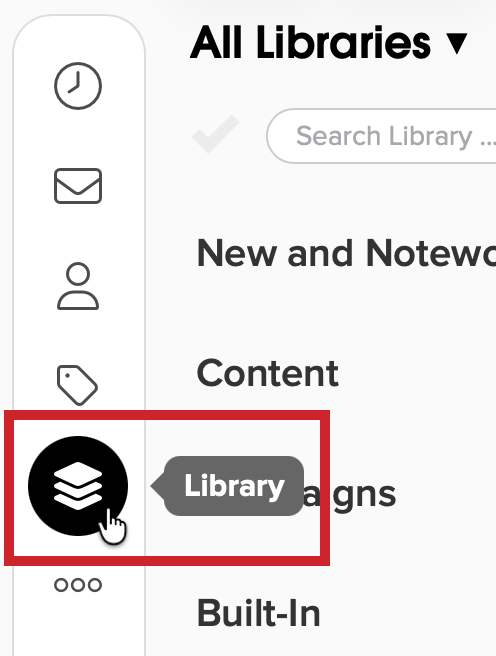
1.) Tap on the Library icon (it looks like a stack of paper) on the left side menu.
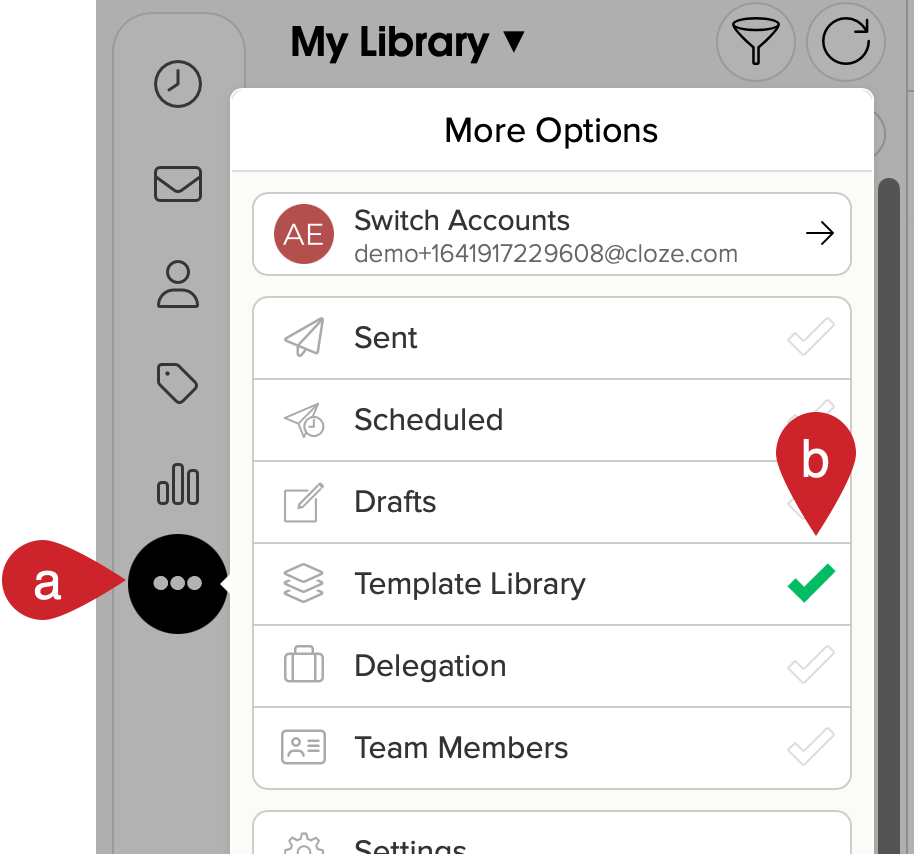
If you don't see the Library icon:
On your computer:
- Tap on More in the lower left on your computer (cloze.com).
- Select Template Library.
2.) Tap on the (+) icon for New Template and then tap on Campaign and select a campaign type (see table below).
When you choose a campaign type, Cloze automatically adjusts the available step types and fields to match that type. This ensures you only see options that are relevant to the campaign you’re creating.

| Category | Type | Purpose | Examples |
|---|---|---|---|
| One to One | Personal | Used for individual outreach | Standard drip campaigns; Client nurture; Lead routing; Post-closing one year nurture |
|
|
Property | Tracking the progress and milestones related to the listing | For example, on a new listing, it might create 10 ToDos for all the things that need to be done for marketing the listing |
|
|
|
|
|
| One to Many | Nurture Blast | Designed for nurture activities that target many people at the same time with essentially the same content | Holiday blasts; Monthly newsletters |
|
|
Property Blast | Announce a new listing or a just sold listing to many people at the same time | Just Listed; Just Sold |
3.) Create your template.
- Name - Enter the name of your template.
- Category - Select a Category for the template.
- Tags - (Optional) Use tags to organize your template.
- Summary - (Optional) Enter a summary of the campaign.

4.) Design your campaign.
You can add as many steps needed to your campaign.
Get started by tapping on the + icon to add to your campaign and then selecting the type of step you wish to add.

When adding a step to a Campaign you have six primary options:
- Communicate - Send an email or send a text
- Wait - Wait for a fixed time, inactivity, a to do to be completed, and more.
- Take Action - Create to do, send alert, and more.
- Change - Change tag, update a custom field, etc.
- Branch - Branch by tag, branch by segment, branch by custom field, and more.
- Repeat or End - Stop, assign, repeat, and more.
Example campaign: In this example, we are creating a simple lead follow-up campaign. Once the campaign has been created it can be tied to a Next Step, Anniversary date custom field, or Lead Source.
For the first step, we are adding "Auto Send Email". Tap on Communicate and then "Auto Send Email".

Tap on a step to set the controls for that specific step. When a Campaign Step is selected it will turn a light gray. Each Campaign step has its own set of controls along the right side of the screen.

Continue building your campaign — select the next step you wish to add to your Campaign by tapping on the + again. You can continue to add steps until you have created your entire Campaign.

5.) Tap on the Review button and select a library to save your campaign.

- Any Cloze user can save a template to their own library (aka My Library), which is your personal library. Only you can see templates in this library.
- Only Admins or other team members with the appropriate permission can save to the Staging Library or a team library.
- Members of your team with the appropriate role permission can access and review templates in the staging and team Library.
6.) After creating and saving your campaign, the next step is to add a trigger to the campaign. The campaign trigger is the setting that "kicks off" or starts the campaign.